The MAP Measurement Tool measures distances (between two points), path distances (multiple points), azimuths, and the perimeter and area of closed paths in page or map units. It can accurately draw lines and measure distances between points using a specified calculation method (e.g. geodesic, cartesian, or rhumb line). Geodesic and rhumb line measurement lines can be curved or straight, depending on the map projection. The measured path can be converted to a line or area in the currently selected layer.
Requirements
To measure ground distances (great circle distance in map units), the Adobe Illustrator file must contain at least one MAP View with an assigned coordinate system.
The map units used by the MAP Measurement Tool are set in MAPublisher Preferences. Use the current layer's map units or select alternative units. The layer's map units are defined in the coordinate system definition of the selected MAP View and can be viewed in the MAP View Editor by clicking the information button of the Source Coordinate System (called Point Style in the Definition tab).
The Adobe Illustrator page units can be accessed and changed in the Document Setup dialogue box (Adobe Illustrator menu File > Document Setup > Units drop-down list).
To use vector snapping while measuring, enable the Adobe Illustrator Smart Guides (Adobe Illustrator menu View > Smart Guides). The snapping tolerance is set in the Adobe Illustrator Preferences for Smart Guides (Adobe Illustrator menu Edit > Preferences > Smart Guides).
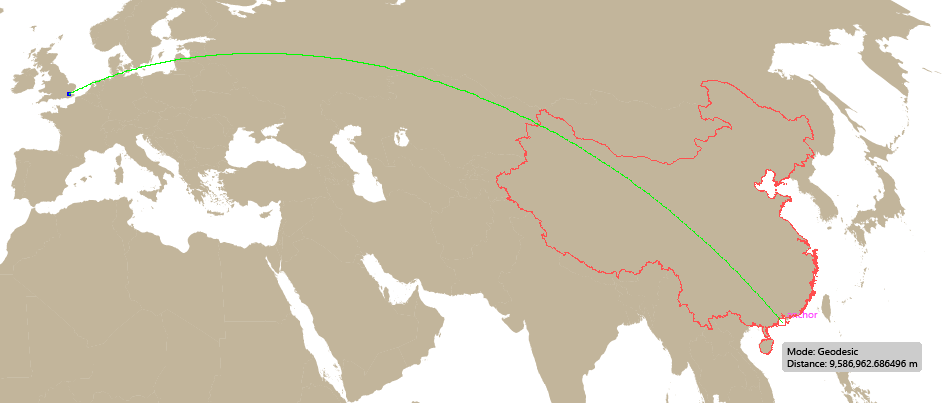
 In some cases (and where it is necessary), the Geodesic & Rhumb line measurements will split and wrap around the MAP View.
Using the MAP Measurement Tool
Click the MAP Measurement Tool button on the Adobe Illustrator Tools panel. The cursor becomes a crosshair.

MAP Layers are measured in map units (great circle or real-world distances). Select a MAP Layer and then click to measure. The units of the layer's parent MAP View will be used in the measurements.
Non-MAP Layers are measured in page units (distances on the page). Select a non-MAP Layer and then click to measure. The units of the document will be used in the measurements.
 While the MAP Measurement Tool is enabled, users can change the selected layer in the Adobe Illustrator Layers panel. If the new selected layer is contained in a different MAP View, the distance values are updated accordingly on the screen automatically without having to start a new measurement — e.g. if the MAP View scale is different, the measurement will significantly change.
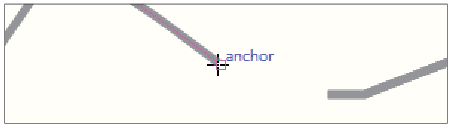
When Adobe Illustrator Smart Guides are enabled, the MAP Measuring Tool can snap to existing anchor points. When the mouse cursor is near enough to a point, Adobe Illustrator highlights it as shown in the image below.
Measure Distance
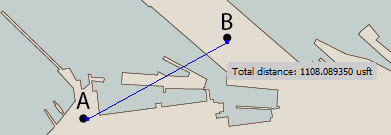
By default, the MAP Measurement Tool measures the distance between two points.
Click a starting point to begin measuring. As the mouse moves on the artboard, a distance label indicates the distance (and azimuths, if enabled in MAPublisher Preferences) from the starting point to the current mouse position. A second click digitizes the endpoint. As soon as the second point is clicked, the measurement is ended and the total distance is displayed.
Measure Path Distance
Click a starting point to begin measuring. Before clicking a second time, hold down the Shift key (the cursor includes a + symbol). A new point is added on the path, but the measurement does not end.
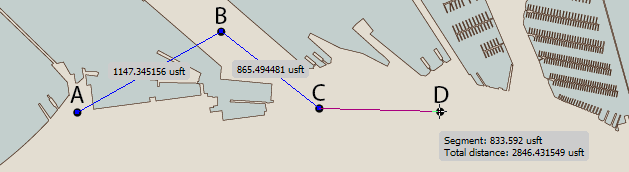
Keep holding the Shift key while adding more points along the path. As the mouse moves on the artboard, a total distance label indicates the length of the path already digitized and the distance from the last added point to the current mouse position.
While digitizing the measuring path, hold the Alt key (Windows) or Alt/Option key (Mac) to display the length of each digitized path segment.
Before adding the last point, release the Shift key. As soon as the last point is clicked, the measurement is ended and the total distance is displayed. Hold the Alt key (Windows) or Alt/Option key (Mac) while clicking the last point to display all annotations (segment lengths and total distance).
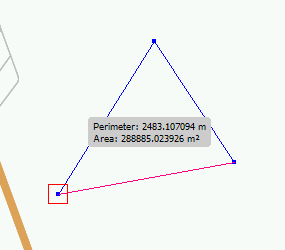
Measure Perimeter and Area
To measure the perimeter and area of a closed path, follow the same steps as measuring the distance of a path. When digitizing the last point, release the Shift button and place the mouse cursor over the start point—a box is drawn around the starting point—click to close the path and end the measurement.
Hold the Alt key (Windows) or Control key (Mac) while digitizing to display the length of each segment.
 Holding down the Shift key while clicking the start point again prevents the path from being closed and the measurement can continue.
Calculation Method
Change the Calculation method to Geodesic, Cartesian, or Rhumb line in the MAP Measurement Tool Preferences. Double-click the MAP Measurement Tool to quickly access preferences. Depending on your MAP View coordinate system, you may have various results using the MAP Measurement Tool:
|
Scenario |
Result |
|
Non-MAP Layers |
• Always uses Cartesian method, regardless of calculation method preference setting • Measurement values will use document units |
|
MAP View without a specified Coordinate System |
• Always uses Cartesian method, regardless of calculation method preference setting • Measurements are in given in ‘ground units’ |
|
Geodetic Coordinate Systems |
• Only Geodesic and Rhumb line methods are available. If Cartesian is the currently selected calculation method, the tool will measure/display in Geodesic • Measurements are given in unit selected in preferences or ‘Meters’ if ‘Use current layer’s unit’ is selected |
|
Projected Coordinate Systems |
• All three methods are available • Measurements are given in unit selected in preferences or, if ‘Use current layer’s unit’ is selected, the linear unit of the coordinate system |
Convert Measurement Line to Art
When any of the above measurement methods are finished, two options are available:
1. Click anywhere on the artboard once to clear the measurement line and label
2. Hold the Shift key and click anywhere on the artboard once. This converts the measurement line to an Adobe Illustrator art object, adds it to the current layer, and applies the current stroke settings.
A new click on the page starts a new measurement. To exit the MAP Measurement Tool, select another tool in the Adobe Illustrator Tools panel.
MAP Measurement Tool Preferences
Access the MAP Measurement Tool Preference by double-clicking the MAP Measurement Tool button on the Adobe Illustrator Tools panel or from the menu Edit > MAPublisher Preferences > MAP Measurement. In Preferences, you can set the number of decimals for the measurement values, enable the display of azimuths, and change the digitized path and new segment colours.
Comments
0 comments
Please sign in to leave a comment.