The Edit Schema function provides settings to edit and manage the attribute structure of datasets, create, edit and delete columns, set visibility preferences, and assign expressions. Any changes made to the schema will instantly be reflected in the MAP Attributes panel.
Using Edit Schema
With the MAP Attributes panel open, click the Edit Schema button or menu item in the MAP Attributes panel options menu to open the Edit Schema dialog box.
 Edit Schema can also be accessed via the Edit Column context menu. Within the MAP Attributes panel, select the column to be edited, right-click the column heading or cell and click Edit [column name]. Edit Schema opens with the same column immediately selected in the column list.
Edit Schema lists all of the columns which currently exist in the MAP Layer attribute structure, including MAPublisher Property attributes (see the previous section). By default, imported or created attributes will be visible, whereas property columns will not be shown by default. Please note some #Property column structures cannot be edited (read-only).
 Toggle visibility of multiple columns at the same time by selecting multiple columns and checking or unchecking the Visible check box.
Edit Column Format
Each column has a name and display name. The name is used in the expression builder and for export. The display name is used when exporting to geospatial PDF and is shown by default in the column name in the MAP Attributes panel (see MAPublisher Preferences).
Punctuation characters are not supported in column names in order to avoid potential conflicts when exporting to external formats. The following illegal characters are replaced with an underscore '_' upon data import or join table:
space ` ~ ! @ # $ % ^ & * ( ) - + = { } [ ] | ; : " ' \ , < . > / ?
To rename a column enter new text directly into the Name field. All expressions referring to this attribute name are updated instantaneously.
 Some external file formats have limits on the number of characters allowed for field names. Therefore, during the export from MAPublisher, some field names may get truncated to comply with the chosen external file format. For example, Esri shapefiles are limited to 10 characters (confirmed up to ArcGIS 9.3), Esri Interchange File (e00) to 16 characters, and MapInfo to 30 characters.
Once the name is set, specify a data type by making the appropriate selection in the Type list.
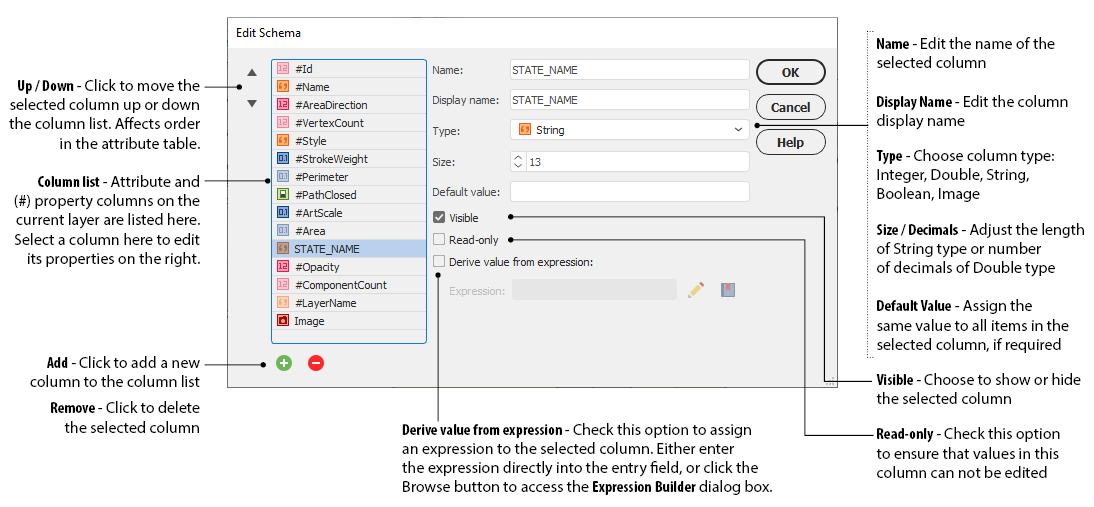
To modify the number of characters or decimals, enter a value into the Size/Decimal text box (the maximum string size is 28000). A Default Value can be assigned for all new objects placed on the selected layer by entering text accordingly. You can also multi-edit Type, Size, and Default Value. Please note that to multi-edit Type, all attributes must be the same Type to start. Check or uncheck the Visible option to edit a column’s visibility. Check or uncheck the Read-only option to edit a column’s read/write status.
Check the Derive value from expression option to assign an expression to the selected column. Enter a valid expression in the Expression field or click the Browse button to enter and edit expressions via the Expression Builder dialog box. The Expression Validity icon will report if the expression entered is valid. Otherwise, it will report and include additional warning notes. This function is useful, for example, to populate the column values based on the contents of other columns and/or mathematical formulas.
 Values derived from expressions are dynamically linked to the attributes used in the expression. Therefore, they are read-only. Use the Apply Expression function to generate values that can be modified.
The following are some examples of basic expressions that can be assigned to columns in Edit Schema:
|
Basic expression |
Result |
|
“Ontario” (applied to column = NAME) |
All items are assigned the value “Ontario” in the NAME column. |
|
“MAP Area 01” (applied to column = #Style) |
All area items are assigned the value “MAP Area 01” in the #Style column and are assigned the Graphic Style “MAP Area 01” on the page. |
|
45 (applied to column = #Rotation) |
All point items are assigned the value 45 in the #Rotation column and are rotated to 45° on the page. |
 String values are case-sensitive and must be entered between quotation marks (“...”).
Add, Delete and Reorder Columns
Columns display in the MAP Attributes panel according to the display order established in Edit Schema. The display order of attribute columns in the MAP Attributes panel can be set by reordering the existing column list. Any column may be moved up or down the list by selecting it and clicking the Up or Down buttons.
To create a new column, click the Add button, and input the desired column properties. To delete an existing column, choose it from the column list and click the Delete button. Click OK to confirm the edits to the schema. These edits will be immediately visible in the MAP Attributes panel.
Comments
0 comments
Please sign in to leave a comment.